

how to fix a toilet that won t stop running
I like working on DIY projects and like sharing my knowledge with others.
How a Toilet Works: A Basic Toilet-Tank Diagram
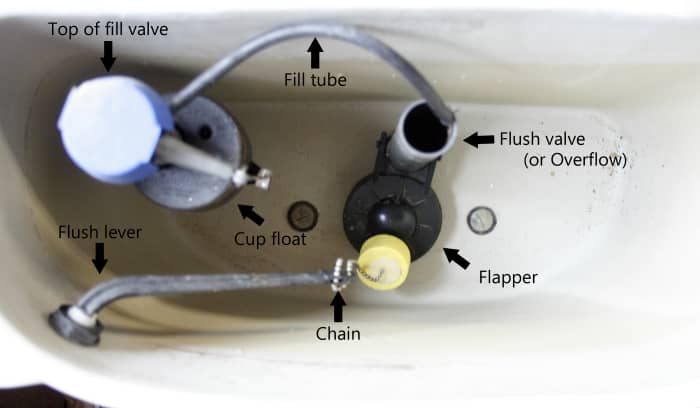
A basic overview of what we will be working with in the tank. Things not included will be given a closeup later on.
Jared Zane Kessie
Shhh!! Do you hear that? That is the sound of your toilet running, wasting up to 200 gallons of water per day. You jiggle the handle with no results. *Sigh*.
But there is no cause for alarm because you are about to be educated on how to stop your toilet from constantly running. And don't worry, you will be surprised at how easy, quick, and cheap these remedies really are.
What Causes a Toilet to Run?
Now that you have a basic idea of the inside of the toilet tank, let's explore the top reasons why a toilet may be constantly running. Here is a list of items we will be exploring:
- Length of the chain: There is a chain that runs from the flusher to a cap, or flapper, that allows the water in the tank to drain into the bowl.
- A bad flush valve flapper: The flapper is connected to the chain and creates a seal to keep water from the tank from entering the bowl.
- Adjust the water level: The screw guide or pinch mechanism for adjusting a float dictates how much water the tank will hold.
- A bad float: If you have a float ball, you might need to replace a bad float, or update to a newer style of float.
- A bent lift arm: The lift arm is connected to the float
- Fill valve needs replaced: The fill valve is what puts water back into your tank. On newer models, it is also where the float cup sits.
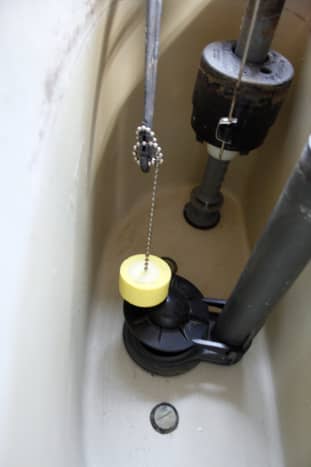
An example of a tangled chain keeping the valve from sealing, thus letting the water continuously run.
Fixing the Chain in a Toilet Tank
In my experience, the chain has most often been the culprit of a running toilet. That or the flapper (covered next).
To determine if the chain is the problem, do the following:
Is the flapper up?
Yes: Continue to next diagnoses
No: Push down on the flapper. Did this stop the sound of running water? If yes, continue to the next step. If no, your problem is not the chain or the flapper, proceed to adjust the water level.
*Helpful hint : You can also put dye tablets, or food coloring into the tank. Watch your bowl to see if the bowl water turns the color of the dye. If it does, then all problems surrounding the flapper are to be explored, as the flapper is not creating a strong enough seal.
Is the chain too long/short/tangled?
- A chain that is too short will not have enough slack to allow the flapper to close.
- A chain that is too long may have so much slack that it slips under the flapper, preventing it from creating a seal.
- A chain that is too long may also become tangled, especially around the lever arm. (See picture above.)
If after checking and fixing the chain the water continues, move on to the next fix.
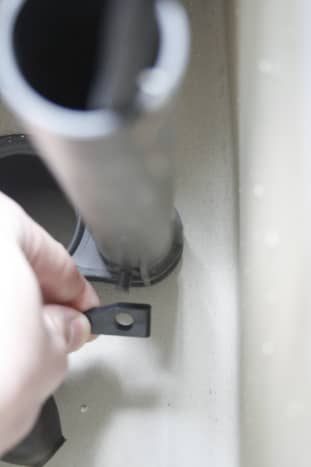


The hing part of the flapper attaches to little 'feet' on the sides of the overflow valve.
Replacing a Flush Valve Flapper
If the chain wasn't the culprit, but you are able to press down on the flapper valve to stop the running, then you might be in the market for a new flapper.
Sometimes the rubber on the flapper can get build up and break down, leaving small holes and entry points for the water to seep through. Depending on its condition, you might be able to clean off the flapper. However, replacing a new one is cheap and very easy.
How to replace the flapper:
- Turn off the water to the toilet. The water shut-off valve is located on the wall behind the toilet, near the floor. Turn right to shut it off.
- Flush the toilet. Doing this with the water off will drain the tank but not fill it back up due to no water supply.
- Undo the chain from the lever arm.
- There are two 'feet' that the flapper attaches to. Remove the flapper from the feet, which are on the sides of the flush valve.
- Pull the flapper out.
Once removed you can inspect the underside of the flapper more closely. To install a new flapper, simply reverse the steps needed to take it out, and adjust the chain appropriately.
Also, it is always helpful to follow the instructions with a new kit, as each kit may be slightly different. The flapper in my picture has a small yellow bobber that not all models will have.
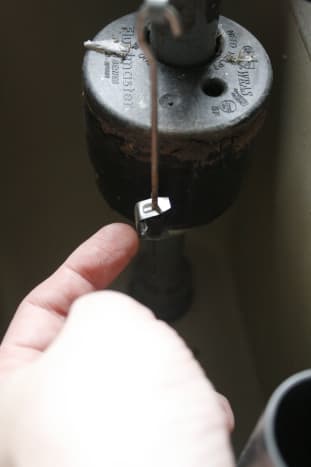
This is the clamp that can be pressed together to move the float cup up and down.
Adjusting the Water Level of a Toilet
Your culprit may be as simple as not having the correct water level in your tank. Either on your float cup or on the tank you may have a fill line. Too high of a float will result in water overflowing into the overflow. Too low of float will result in the flapper staying open. Use this as a guide.
To adjust the water level, you simply adjust the float.
Ball float: Trace the ball float to the arm, and the arm back to the fill valve. On top of the fill valve will be a screw. Turn the screw clockwise to lower the water, counter to raise.
Float cup: You can either adjust the whole valve itself by grabbing and turning the top of the valve and lifting up to increase water or down to decrease. This should have been done during installation, but you never know, something could have happened to cause this to fall.
The best option is to adjust the height of just the float by locating the tab attached to a metallic rod connected to the float. You will find a small clip that you can pinch together to allow you to slide the float up and down, thus increasing or decreasing how much water is in the tank.
Replacing a Toilet Float
Checking the ball float:
To see if you have a bad ball float, see if it is partially submerged in the water. If it is, you most likely have a hole in the ball float that is allowing water to get in. You want the ball float to be floating on top of the water. Any submergence of the ball would result in an open flapper.
How to replace the ball float:
The float ball will be another easy fix that requires you to simply unscrew the ball from the end of the arm. Taking the ball off can also allow you to shake the ball to see if there is any water in the ball. Replace with a new ball if necessary, or you can update and replace the whole fill valve assembly with a newer float cup model.
Checking the float cup:
Replacing the float cup generally means you need to replace the whole fill valve. There is a kit for this that allows you to replace the fill valve with a new float cup included. If you feel this is the problem, head down to the section on replacing a fill valve.
How to Fix a Bent Lift Arm in a Toilet
This is geared more towards the ball-float style of toilets. There are occasions when the lift arm gets bent, forcing the ball down lower than it should be, maybe even partially submerging it.
You can either:
- Bend the arm back into place using your hands.
- Replace the bent rod.
- Replace the float and fill valve with an updated fill valve with float cup.
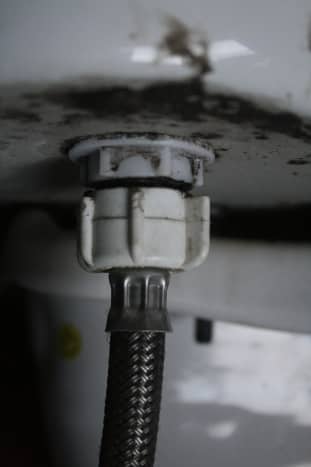


This is where the hose meets the tank. The large white portion with blades is the part of the hose you will unscrew off to disconnect the water hose.
Replacing the Fill Valve in a Toilet
If all else fails, you may have a faulty fill valve. This would be your last resort as it takes more steps and requires a moderate skill level to complete.
If you feel this is the culprit, or simply want to replace your current fill valve and float system, follow these steps:
- Turn off the water to the toilet (located on the wall behind the toilet). Follow the hose leading from your tank to your wall to locate a knob to turn off the water.
- Flush to drain water from the tank.
- Un-clip the plastic hose running from the fill valve to the overflow tube.
- Place a bucket under the tank where the water hose feeds the tank.
- Disconnect the water hose where it meets the tank. You should be able to do this by hand, but you can always use a wrench to get you going.
- Once the hose is unscrewed, place the hose end into the bucket to catch water left in the hose.
- Place the bucket under the tank where the fill valve is. There should be another nut to unscrew under the tank that holds the fill valve to the tank. Unscrew this using hands or a wrench. Any remaining water will be draining out of the tank during this and the next step.
- Take note of how the fill valve is facing for future reference. Pull out the fill valve.
You have completed the first half, now on to putting in the new fill valve.
- Follow the instructions provided with your new fill valve to do a quick assemble.
- Place the new fill valve through the hole in the bottom of the tank, angling the float and valve top to face the middle of the tank.
- Adjust the height of the fill valve to fit your tank by holding the top part of the fill valve, twisting, and pushing to lower or pull to raise (this was mentioned above).
- Screw the nut to the threaded portion of the fill valve located under the tank (the part you stuck through the hole).
- Connect the hose to the remaining portion of the fill valve, under the nut you just put on.
- Clip the plastic hose back onto the overflow valve.
- Turn the water on.
DIY Fix a Running Toilet
With low-cost parts, simple fixes, and a relatively short amount of time, fixing a running toilet yourself is a way to save you some headaches and money.
Best of luck to you as you fix that annoying running water once and for all!
This article is accurate and true to the best of the author's knowledge. Content is for informational or entertainment purposes only and does not substitute for personal counsel or professional advice in business, financial, legal, or technical matters.
© 2012 Jared Zane Kessie
Rita Alcaraz on August 04, 2018:
No water running in tank
Better Yourself from North Carolina on April 03, 2013:
Another great hub - This is so helpful!! We just noticed a running sound with one of our toilet so this will help us figure out what is wrong with it! Thanks!
Rachel Vega from Massachusetts on April 24, 2012:
Wow, this is great! Great pics, too. I've never really wanted to get this friendly with a toilet tank, but now that I know it's not so scary in there I'm less likely to ask someone else to do it. Very interesting. Voted up!
how to fix a toilet that won t stop running
Source: https://dengarden.com/home-improvement/How-to-Stop-a-Running-Toilet-A-Beginners-Guide
Posted by: vegafallsocring.blogspot.com
0 Response to "how to fix a toilet that won t stop running"
Post a Comment